Tegola Canadese Eco Roof Hexagonal Tiles
Eco Roof Hexagonal Tiles
ECO ROOF HEXAGONAL TILES
Simplicity is synonymous with style if you talk about Premium Rectangular. The historic rectangular shaped bituminous shingles continue to be current.

FEATURES
EXCLUSIVE DESIGN
Exclusive DESIGN for any roof and context, thanks to the wide range of models and colors

WATERPROOFING
WATERPROOFING to ensure your roof quality and durability over time

LIGHTNESS
Lightness above your head to guarantee maximum safety, even in the event of a seismic event

RESISTANCE
Resistance to any extreme conditions, to hailstorm, to strong winds

SIMPLICITY
Simplicity they adapt to any shape and slope of the roof, easy to transport and apply… even on the construction site

INFORMATION

BRAND
Tegola Canadese
PRODUCT TYPE
Roof Tiles and Slate
COLLECTION
Eco
WEIGHT
9.40 kg
TILES PER PACKAGE
16 (n°)
SURFACE PER PARCEL
2.32 (m2)
SURFACE COATING
Ceramic-coated basalt grit G-EVO
SET OF THE FLAPS
Self-adhesive pads Self-adhesive tabs
DOWNLOADS
↓ Data sheet
↓ Installation
HEIGHT OF SLITS
>143
THICKNESS
3
EXPOSED AREA
145/EN 544
BITUMEN PER SINGLE LAYER
>1000 g/m²
WATER ABSORPTION
<2 %/EN 544
DESCRIPTION
This product does not contain asbestos and tar
DIMENSIONS (100x34 CM)

RESISTANCE TO UV RADIATION
Pass/EN 1297
REFERENCE STANDARD
EAD 220020-00-0402
FLOW RESISTANCE, AT 90°C
<1mm/EN 1110
TENSILE STRENGTH MD/CMD
>600 N/50mm / >400/EN 12311-1
RESISTANCE TO TEARING
>100N /EN 12310-1
RESISTANCE TO BLISTERING
Pass/EN 544
SAFETY
The material is free of asbestos, tar compounds and other dangerous substances.
STORAGE
Store pallets in closed warehouses, away from heat sources and direct sunlight. Store in the original packaging. Do not stack pallets.

OTHER INFORMATION
The characteristics expressed refer to the standard production. Tegola Canadese reserves the right to update the technical data sheets without notice. Further information on installation available
APPLICATION
Application on pitched roofs, with a slope between 5° and 85°. Installation temperature above +5°C. Always check the adhesion of the pads or of the shingle at the end of the installation.
GRANULES ADHESION
<1,2 -g/EN 12039
EXTERNAL FIRE RESISTANCE
Broof (t1)/EN 13501-5 / EN 1187
TYPE
Polyethylene Film
REACTION TO FIRE
E/EN 13501-1 / prEN ISO 11925-2
M²/BUNDLE
2.32
M²/PALLET
185.60
PROPERLY SUPPORTED
The easy and correct installation of asphalt shingles depends entirely on the roof deck being smooth, continuous, clean, and dry .The roof deck can be built with wood materials (such as Tegodeck seasoned tongue or groove planks , plywood, etc.) properly supported.
DETAIL
PRELIMINARY OPERATIONS
On wooden substrates it is good practice to apply a bituminous underlayer membrane, also self-adhesive, such as «Safety» or «Startbar» following the procedures described on the side. It is necessary to glue and fix with nails under the overlap of the sheets.

INSTALLATION
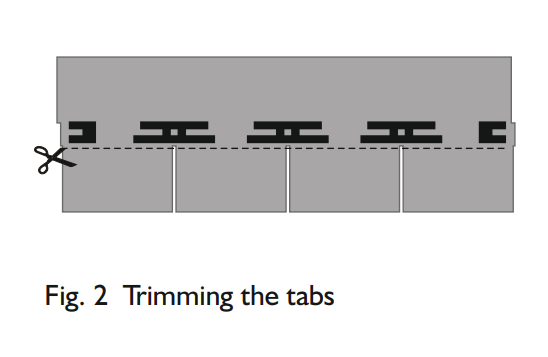
Apply a line of bituminous mastic “Bitustick” along the eaves (Fig. 3); trim the tabs from the bituminous shingle to form the starter course (Fig. 2) and align it to the line z (see Fig. 3). Ÿ Install the first row of shingles along the line AD (Fig. 4). Ÿ Install the second row of shingles along the line z (Fig. 4). Ÿ Repeat this installation method until all pitches are completed. The trimming and aligning operations are simplified following the cuts on the upper edge of each bituminous shingle.


COLORS

VIDEO
GALLERY