Living Concrete Parquet Concrete Tiles
PARQUET CONCRETE TILES
PARQUET CONCRETE TILES
Our Parquet Concrete Tiles are a perfect choice for a lot of construction projects. Boasting a 4x lighter weight and an 8x higher strength, these tiles can be effectively used indoors and outdoors to get the ideal results.


They’re made using our bespoke manufacturing process which allows for the composition of ultra thin, large tiles which are strong, have amazing UV stability and offer high levels of mechanical resistance.
When we make our tiles, we use a special combination of cement, specific sand, carefully chosen additives and UV stable pigmentation. The result is a concrete surface with a high level of hardness making it suitable for any and all applications. Our tiles always stand out for being tough and long-lasting.
We tailor our tiles to be suitable for indoor and outdoor spaces. As you can imagine, this flexibility makes them a great choice for anyone who is looking at getting access to a cost-effective and long-lasting solution for their projects. Furthermore, we offer you a complete installation service for all the products we sell – to find out more, please get in touch.
iNFORMATION
BRAND
Living Concrete
CATEGORY
Concrete Tiles
USE
Internal and external
BTX CONCRETE FEATURES
- Suitable for floor and wall installation both indoor and outdoor
- Large format / ultra thin tiles with superior strength
- High mechanical resistance and UV stability
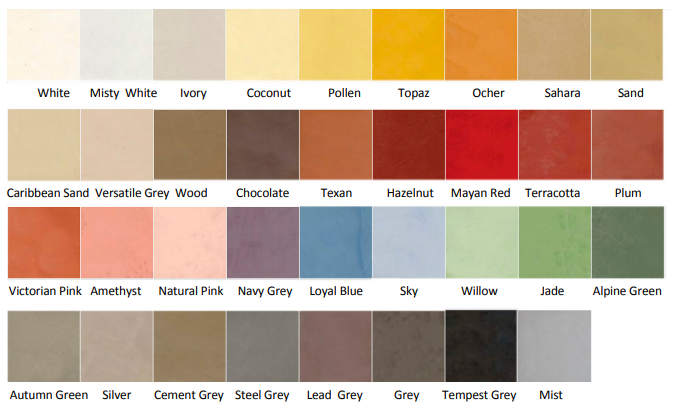
- Available in different textures and colours
TOLERANCES
- Thickness +/-5%
- Side straightness : +/-0.5%
- Orthogonality : +/-0.6%
- Planimetry : +/-0.5%
- Length and width : +/-0.6%
MINIMUM ORDER
10m2
STANDARD SIZES
400 × 80 x 10 mm
FINISHES
Unsealed or a choice or Matt, Satin or Gloss (we recommend sealing to limit staining).
VERIFICATION OF THE AESTHETIC APPEARANCE
Please check and ensure that you are happy with the delivered product and there are no apparent visible defects. If any issues are detected do not start the installation and contact supplier immediately. No claims will be accepted after tiles have been installed.
COMPOSITION
- Cement
- Selected sand
- Specially designed additives and UV stable pigments
- The BTX Ultra High Performance Concrete tiles stand out because of their versatility, durability and high hardness, making them suitable for all types of applications.
DELIVERY AND PACKAGING
- Secure packaging for each tile
- Palletised delivery
- Installation data sheet
TEXTURES

DOWNLOADS
↓ Product Sheet
↓ Installation Guide
↓ Silk Finish Slip Resistance Report
↓ Sandblast Finish Slip Resistance Report
STORAGE
- Keep in a dry, clean space in the original packaging
- Panels should be kept in a horizontal way
CLEANING & MAINTENANCE
- Clean with neutral detergent
- Use wax maintainers or self-polishing cleaners
MECHANICAL PROPERTIES
- Yield strength (modulus of rupture) : 5-8 mpa
- Tensile strength (modulus of rupture) : 2-5 mpa
- Compressive strength: 20-30 mpa
- Impact strength: 5-10 KJ/m2
- Thermal expansion coefficient : 20 x 10-6/°C
- Absorption : Low water permeability
- Dorry wear : 2.5 mm
- NOTE: These values are for reference only and are estimated as formulation. They may vary according to formulation, treatment and manufacturing processes.
COLOUR VARIATIONS
Because of its cementitious composition the colour of BTX tiles may have different textures and tones within the same tile and / or in comparison to other tiles in the same batch. Our colour selection chart is for reference use only and the colours are as close as possible to the original colours.
INSTALLATION
INSTALLATION GUIDE
- Base: solid concrete screed with flat surface and no loose particles
- There can be no rising or negative humidity
- Verify that the base is levelled
- Allow for the perimeter joints
STORAGE
- Tiles should be kept in a horizontal way in a dry, clean space in the original packaging
- Do not leave the tiles in a vertical or inclined position or leaning against any surface
HANDLING
- Handle in a vertical position, never horizontally
- Keep in the original packaging until the installation
- Do not stand them on the edges
JOINT GROUTING
- Apply the grout according to manufacturer’s instructions
- Apply once Living Concrete water based sealant is dry
ADHESIVE & GROUT
- Living Concrete recommends Mapei Keraquick S2 mixed with Latex Plus Admix and Mapei flexible grout suitable for use with 10 mm trowel. Installation should be made applying adhesive to the tiles and base (smooth trowel on the tile and 10 mm notched trowel on the floor).
- Use Ditra Mat underlay where there is a risk of surface movement: ie new concrete screeds
SEALING AND PROTECTION
- Once the adhesive is dry apply Living Concrete’s water based sealant. Apply sealer with short pile sealing pad, roller or spray gun.
- Allow a minimum of 2 coats for internal and 3 coats for external installations
- Wait for 2 hours between the coats
- After final coat of sealant allow 6 hours before traffic
INSTALLATION USING FLEXIBLE TILE ADHESIVE
- Apply a layer of flexible tile adhesive to the floor with the notched side of the trowel
- Use the 10 mm notch trowel to create ridges
- Ridges should be created along the long side of the tile.
- Never apply the tile adhesive in swirled shape or without notched trowel
- Adhesive application to the tile should be with the smooth side of the trowel covering all surface of the tile
PATINATING TILES
- Mix the pigment with water
- Moisten a cloth or oakum and put the patina on in the required direction
- Remove excess or remaining patina with a clean dry cloth
- Apply at least 2 coats of protective sealant following the same direction. Do not mix sealant with pigment or this will compromise sealant’s durability
INSTALLATION
- Ensure that installation surface is clean
- Prepare the adhesive according to the manufacturer’s specifications
- Unpack the tiles removing the protective wrapping ONLY on the underside of the tile and NOT the protective wrapping from the top side of the tile until all tiles are installed.
- Remove top protection once the tile adhesive is set and tiles securely glued the surface
- Apply coat of water based sealer to protect from staining and allow to dry.
- When installing the tile apply pressure from the top to ensure adhesive is evenly distributed in between the tile and base surface to ensure firm bonding.
- For correct bonding ensure that adhesive covers the entire tile and base surface.
- Leave a minimum of 5mm gap between the tiles
- Cut the tiles using concrete or porcelain cutting tools
- In the case of walls, columns or other vertical surfaces continuous perimeter joints must be left with no less than 8mm wide joint left empty or filled with expanded polystyrene or silicone as an expansion joints.
CONSIDERATIONS BEFORE INSTALLING LC BTX TILES
- Keep packaged until installation.
- Do not force the tiles over uneven surfaces.
- Always store horizontally.
- Do not place loads on the tiles.
- Level the sub-floor correctly before starting the installation.
- Place the tiles on the floor to choose your colour composition.
- Leave at least 5 mm for joints.
- BTX tiles are not rectified, they can have variations of 0.6%.
- Keep your hands clean to avoid staining the tiles.
- Use spacers for joints.
- Plan the installation and necessary cuts.
- Keep the tiles protected during installation and whilst the adhesive is drying.
- Allow sealant to dry for 2 hours between the coats.
- During hot summer days avoid direct sunlight on the tiles and keep the installation area shaded.
- Do not install the tiles in wet weather.
- Do not install the tiles with visible manufacturing defects. Contact your supplier.
- Do not use abrasive products to clean the tiles as they will damage the protective coating and can change the tile appearance.